
This Man Found A Toy Guitar In Walmart. The Song He Plays With It Blew Me Away!

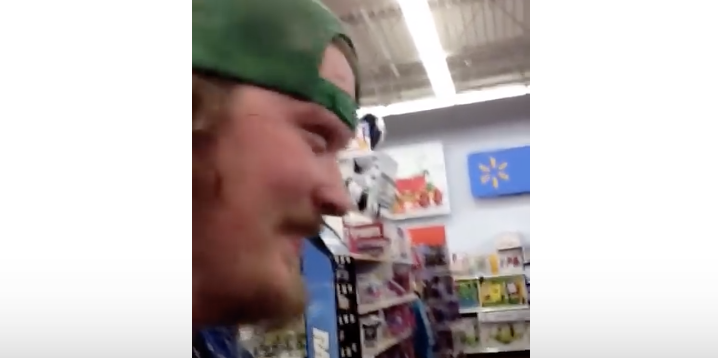
Whenever you step into a Walmart a chaotic and loud scene usually greets you. It can get really hectic in the store between children running wild, their parent’s yelling at them, people walking way too slow, and all the other odd sights and sounds that bombard your senses. However, a video has emerged that shows there may be something good and positive to associate with Walmart.

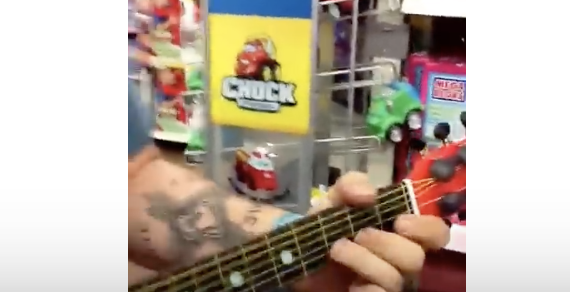
Clay Shelburn and Zac Stokes uploaded the awesome YouTube video that shows them performing on a toy guitar in the Barbie aisle at 3 o’clock in the morning. The self professed “Walmart Rockstars” go to town on a bluesy acoustic-style rendition of Stevie Ray Vaughan’s hit song Pride and Joy.
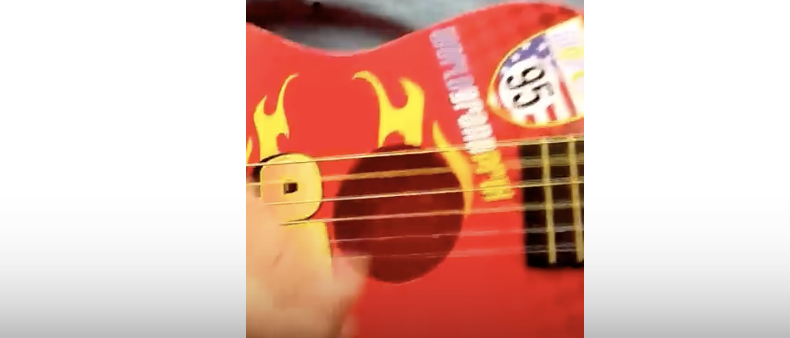
Clay starts strumming the dinky little red guitar and immediately you know that he can play. I have never heard a toy guitar sound this good, or even knew they were capable of sounding so pleasing.
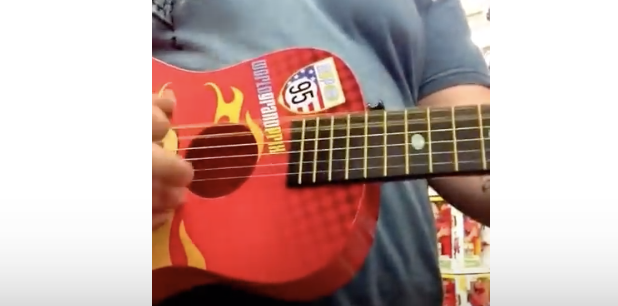
Both boys take turns doing vocals and they deliver a pretty solid performance. This is easily the best thing yet to come out of a 24 hour Walmart at 3a.m.! Both boys are from Fort Worth, Texas and are members of bands that bear their names.
When they aren’t doing gigs at Walmart the Texas musicians perform at shows all around the area. They clearly have talent and love for their art, so be sure to check them out if you’re into bluesy, country, southern rock music!
Please Share With Family and Friends
He Takes A Used Beer Bottle And 8 Bucks Worth Of Supplies. The Result I Need THIS For My Backyard!

If you are looking for a way to spruce up an outside patio or seating area then try making these easy, affordable, and unique looking tiki torches. The homemade torches make a clean and safe alternative addition to outside spaces and look a lot better than the average, boring, store bought, ugly tiki torches your used to seeing. The project uses recycled wine or beer bottles and a few other supplies that can be picked up at the hardware store for less than $8. It only takes about five minutes to transform a patio from drab to fab, so try it today!
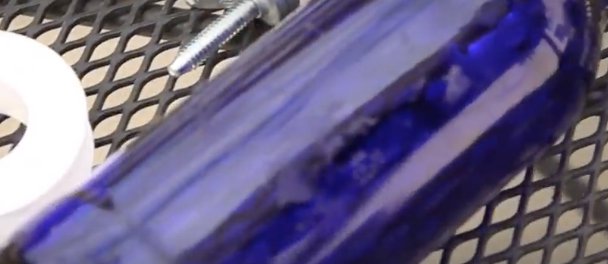
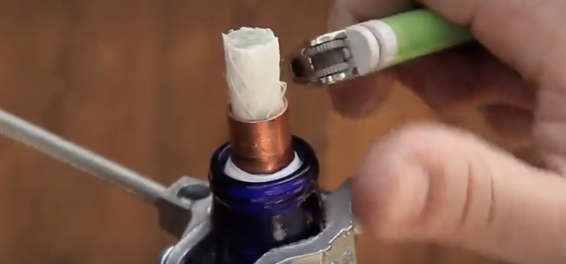
To do it yourself at home you will need the following supplies; 1 glass bottle, 2 grounding clamps, ¼ inch threaded rod, a roll of Teflon tape, ½ inch copper coupler and cap, and a replacement torch wick. Depending on how you want it to look and where it is going to be placed, you may need to shorten the threaded rod, so try to get a smaller one if possible or you will need to cut it. Also, make sure to empty out the bottles before you get started!
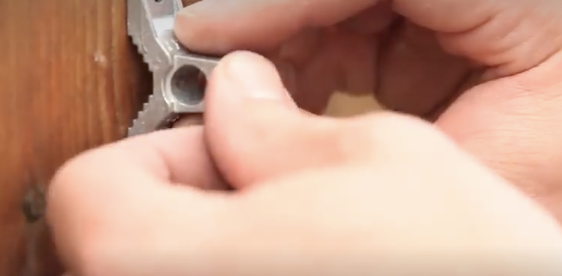
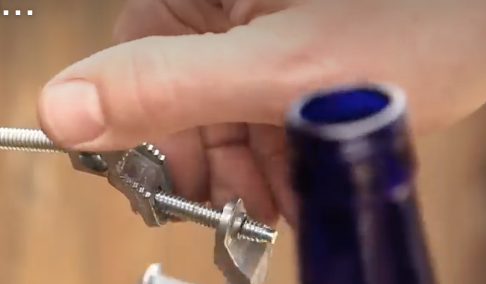
First, scout out a location for where you want to place the tiki torch. Attach one of the grounding clamps by screwing it into place and then attach the threaded rod to it. Then attach the second grounding clamp to the other end. Take a bottle and use the clamp to hold it in place. Grab the copper coupler and wrap Teflon tape around one end so that it fits securely in the bottle opening.
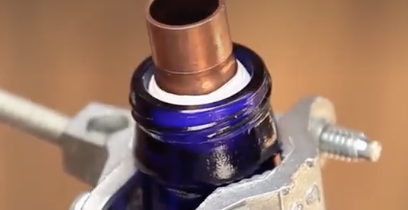
Make sure it is very snug and water tight before filling the bottle with torch fluid. Run the wick through the coupler and set it inside the bottle. When you are not using the torch remember to re-place the cap back on top of the wick/coupler to keep water out.
That’s it! In a few minutes your patio will look fresh and upgraded with these torches. The best part is that they look expensive and professionally done but they cost so little. Make sure you remember to save all the cool looking bottles you drink for this project!
Please Share With Family and Friends
Have You Ever Thought About Transferring Your Old VHS Tapes To Your Computer? This Is How It’s Done.

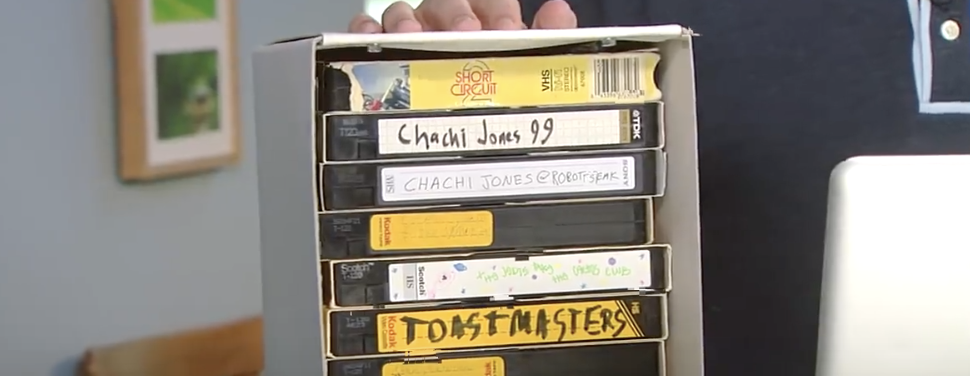
Technology is constantly being improved and advanced, which has led to a number of once new and innovative products being rendered obsolete. VHS players are a perfect example, as the previously popular and must have items are now a thing of the past. As a result, many people’s collections of VHS tapes go unused, sit in boxes, and take up space around the house. If you want to preserve the homemade videos and memories they contain then transferring the tapes onto a computer is the ideal way to go. By saving them in a new, updated format you can easily share them with others, edit the content, and watch videos without having to break out the old VHS player.

In this quick how-to video CNET senior editor, Donald Bell, walks us through the process of transferring VHS tapes to a computer. He makes clear the point that this is for archiving home video footage only and not copyrighted TV shows or movies. It is illegal to duplicate and/or distribute those programs and doing so violates their copyrighted content and can get you in a lot of unnecessary trouble.
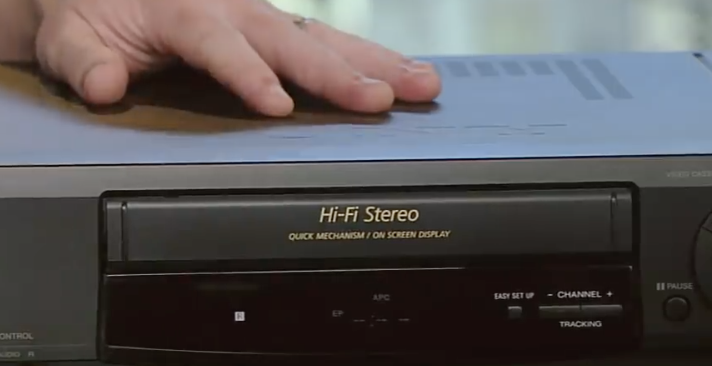
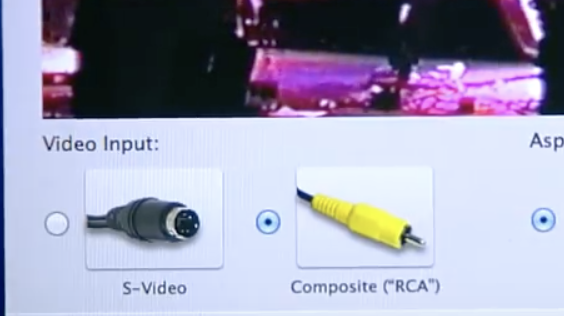
To do this transfer you need a VCR player with audio and video output, VHS tape(s), a computer with room on the hard drive, and a compatible adapter to connect the computer and VCR. An hour of video will take up approximately 750 megabytes of storage on your computer’s hard drive, so if you prefer to save space on your computer use an external hard drive. Also, the adapter must be compatible with the type of computer you’re using, a PC or Mac, or it just won’t work.
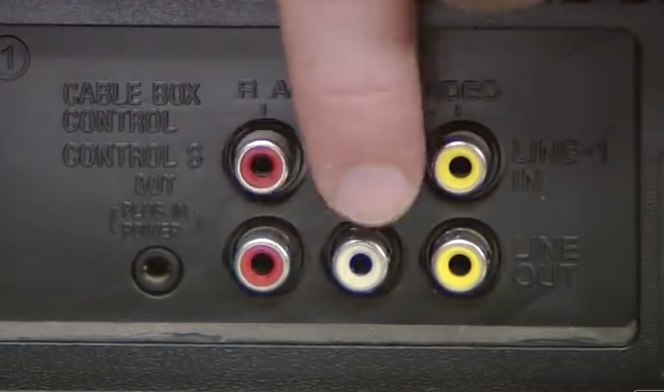
First, plug in the adapter’s color coded ends to their matching connections on the backside of the player. The yellow connection is for video, white is for mono audio, and white/red is for stereo audio. Install the software that’s included with the adapter and follow the steps it takes you through until you’re able to see and hear the video, which shows that you are properly connected.
At this point you may name the file and start the transfer. Press the record button and hit play on the VCR to record in real time, which means you have to wait for the whole thing to play through, and press stop recording when you’re done. Now you can edit out any unwanted portions from either the beginning or the end of the video.
Finally, it shows you a file path to the location of the file you just created, plus options to watch, upload or further edit the video. Now you can burn the videos onto DVDs or transfer them to other computers and throw out the bulky VHS tapes or put them in storage for good!
Please Share This Tip With Family and Friends
Fathers and Their Children Ask Each Other A Simple Question. The Result I Can’t Hold Back The Tears.

Have you ever wanted to ask your father if he is proud of you, or tell him how grateful you are that he’s in your life? Fathers tend to have a hard time expressing their emotions and often have difficulty opening up to their children. A lot of what they are feeling is never said out loud and communicated, which leaves kids feeling distant and left to guess as to what their dad may really be thinking. This can be unhealthy and lead to a lot of mistaken assumptions that may hurt kids feelings and go un-addressed for years.

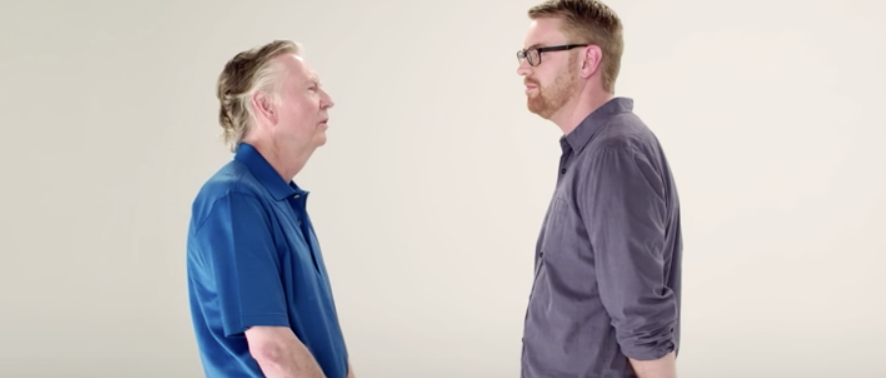
It is society which as taught and come to expect fathers to behave in this emotionally distant manner, while mothers are expected take on the primary emotional support role in their kid’s and families lives. That is the motivation behind this video about the #TellThemNow campaign, which encourages more open and direct lines of communication between fathers and their children, regardless of how old they may be.

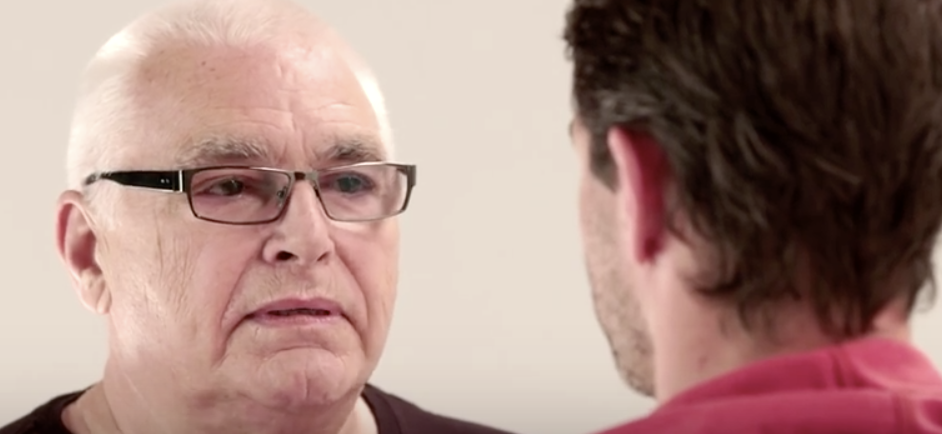
The people in the clip were only asked to participate in a short video and weren’t told anything else about what it entailed. A father and child pair were directed to stand closely facing one another, and the son or daughter began by asking the question, ‘What about me makes you proud?’ to their dad.

All the responses that followed were genuine, and from the heart, being said on the spot. Some dad’s answered saying, “everything,” “you’re loving,” “funny,” “you helped me,” and so on, elaborating from there and opening up much further. The pairs were surprised by how powerful and emotional the simple exercise was and some even cried, others laughed and hugged, but they all felt a deeper connection.
What made this so raw and true was that it was sudden and unrehearsed. These people all finally spoke out loud what had been on their minds and in their thoughts for so long. Finally, they felt safe to express, and hear, what they should have shared with each other all along.
We never know how much more time we have here on Earth or how long our loved ones will be with us, so before they are gone you should tell them how you feel. Hopefully you were inspired to reach out to your father to connect with him and open up. Father’s day is a week away, so now is the perfect time to call him up and tell him you love him if you haven’t done so already lately.

Please Share With Family and Friends
Dad and Daughter Were Parasailing Over The Ocean. What They Caught On Cam Is An Unexpected Surprise!
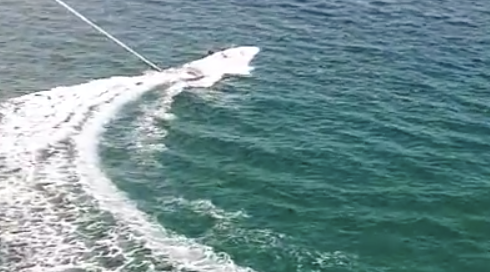
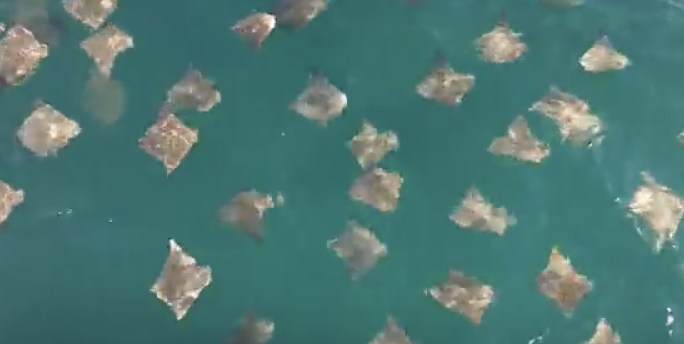
For one father and daughter, what began as a leisurely parasailing adventure quickly turned into a bird’s eye view of something few ever get the chance to see! While they are flying high, they notice a huge number of what look like small dots just under the surface of the water. The driver of the boat notices as well, and lines them up for the perfect video shot. As they are lowered back towards the boat, the “small dots” become a massive group of enormous stingrays!
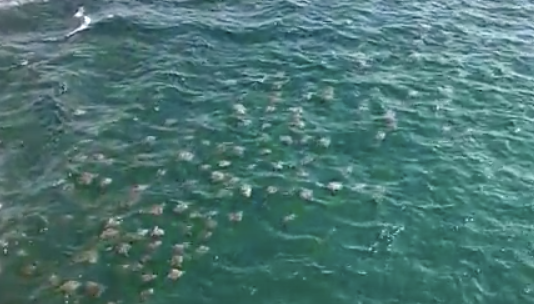
What you are witnessing is likely the migration of the poisonous golden cow-nosed stingray, which gets its name from the two horn-like protuberances at the front of their bodies, which can be seen in the video if you look closely. Twice a year, they migrate through the Gulf of Mexico for feeding and mating.
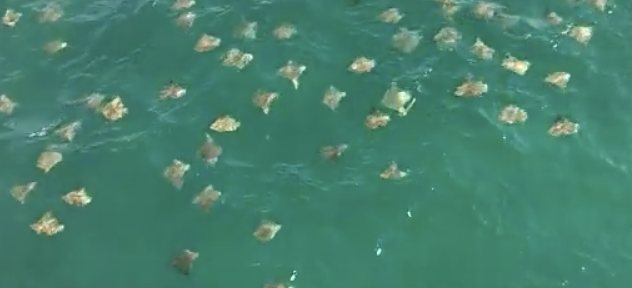
Each stingray can be over 6 feet wide, and there may be up to 10,000 rays in this group! Stingrays, although many are poisonous to humans, are docile creatures. They attack only when threatened, usually when stepped on.
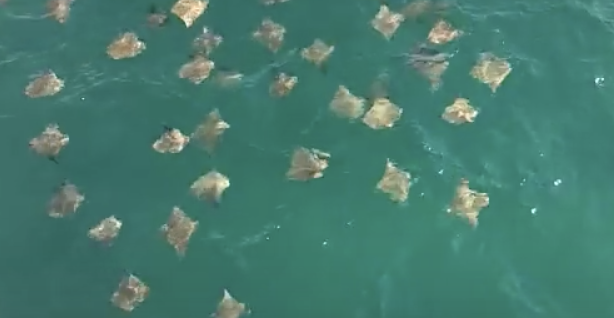
They are more likely to be threatened by their relatives the sharks, who also happen to be their main predator. And you thought your family was rude! Let us know what you think about this incredible video in the comments.
Please Share With Family and Friends
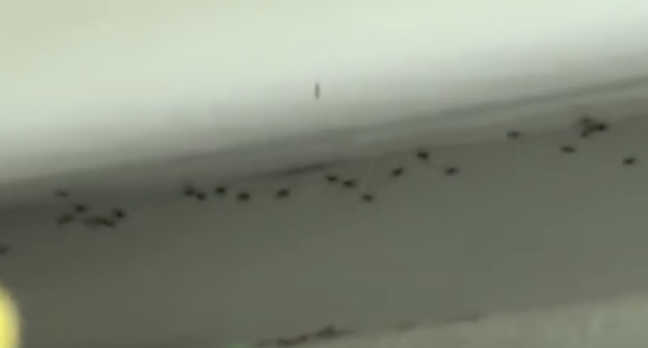
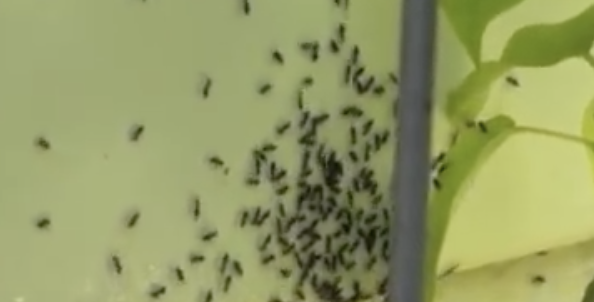
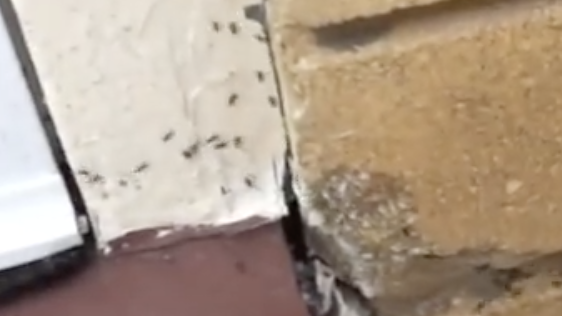
Do You Have An Ant Problem? Get Rid Of Them For Good This Year Naturally With This Simple Trick.
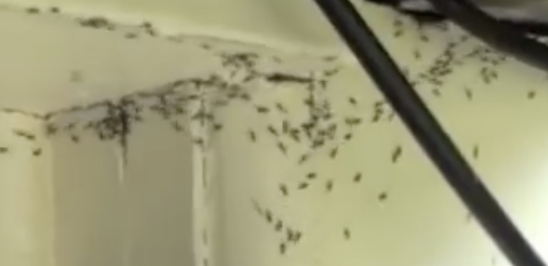
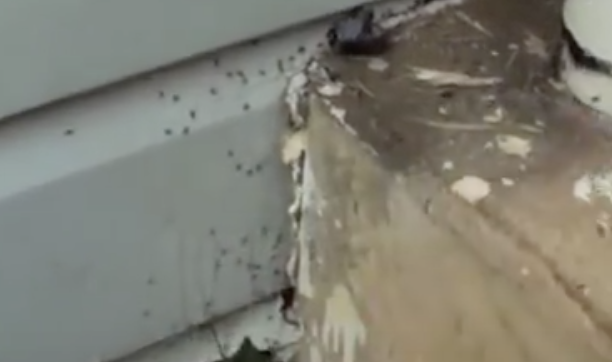
Ants can be found all over the world, but one place nobody ever wants to see them is inside the house. Even if you see one lone ant, chances are that hundreds more are lurking nearby. If you do happen to have an infestation or need to get rid of a few pesky ants, definitely try this simple and all natural solution.
It’s much safer than using harsh, toxic, chemical based insecticides like Raid, and just as effective. Best of all it’s cheap to make, so stir up a batch and restore your home to an ant-free setting.
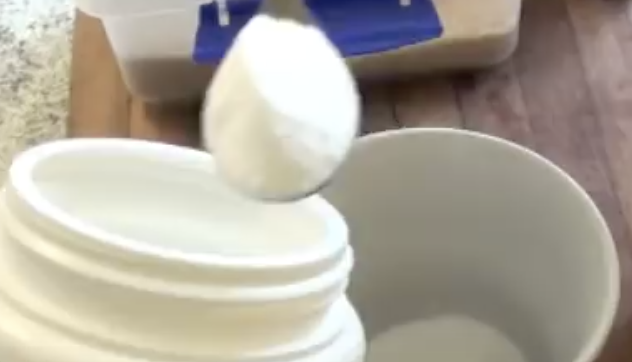
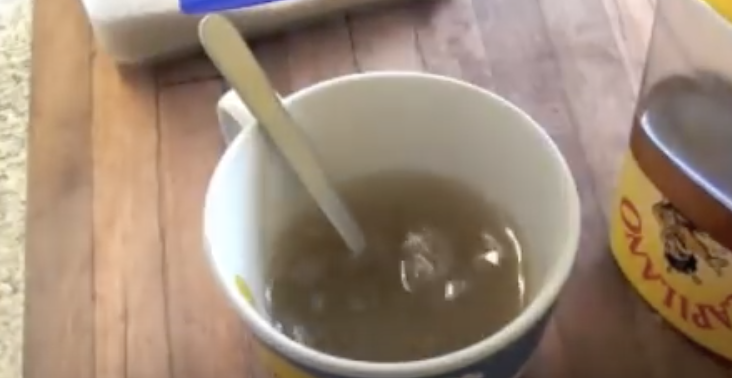
This ant control solution requires hot water, borax, sugar, honey, and a spray bottle. First, boil up some water. In a cup combine 6 teaspoons of sugar with 6-8 teaspoons of Borax. Pour in some boiling water and stir until it is completely dissolved.
Then add some honey to the cup, and more hot water if you need to, and stir it all together. Once it has cooled, pour the mixture into the spray bottle and go find some ants to get rid of.
Only use this spray outside the house, it is safe to use on plants as well. Spray the mix on and around ant trails and focus on cracks and places where they may be entering the house. Allow the solution to pool in high problem ant traffic areas and spray around the foundation.
Do NOT let pets or animals near it because they can get very sick if they lick or ingest it. You can take a small plastic bottle cap or similar object and pour some of the solution into it, then place it somewhere that animals can’t reach. To be extra safe, block access to the mixture even further, by placing a pot or cover over it.
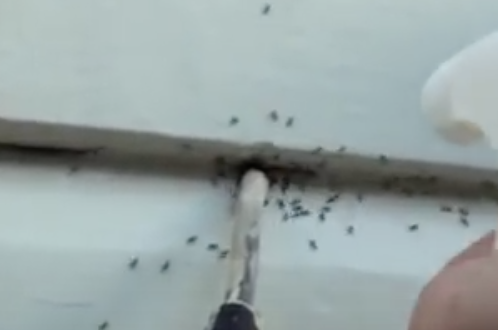
The ants will be attracted to the sugar and honey, then they will tell their fellow ants about it and lead them to the sugar source. Once they ingest it, the borax builds up a gas inside of them which causes their death.
It’s a great way to get rid of carpenter ants that may be causing a lot of damage to the house, deck areas, and stored lumber or wood piles. The comments in the video say that it works well and since it can be made for around fifty cents, you may as well try it!
Please Share This Tip With Family and Friends
Do You Hate Mosquitos? This Easy Trick Will Stop Them From Ruining Your Entire Year!
Mosquitoes are nasty and highly irritating bugs that can ruin an otherwise perfect time. The way they buzz and swarm around, waiting to land on someones warm skin to bite, is enough to drive anyone insane.
The pesky blood suckers are carriers of a number of diseases that they can transmit straight into your body when they bite. In fact, every year almost 700 million people world-wide end up contracting a mosquito borne illness, resulting in over a million deaths. This scary fact makes them the number one killers of humans.
While it’s best to avoid them all together, that is basically impossible. People commonly use bug zappers, horrible smelling chemical repellents, and mosquito nets to try and combat the pests.
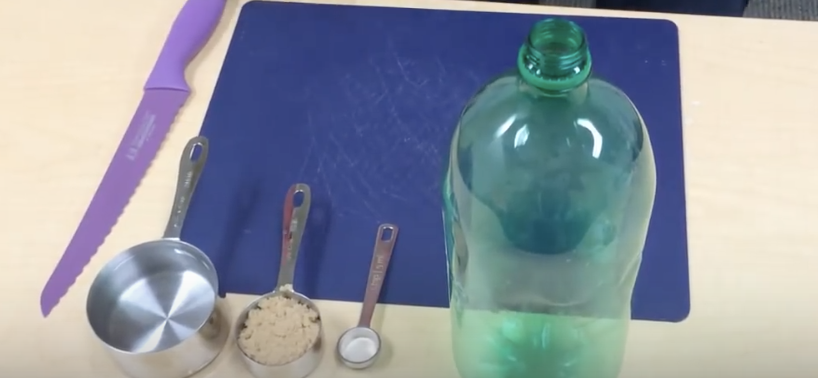
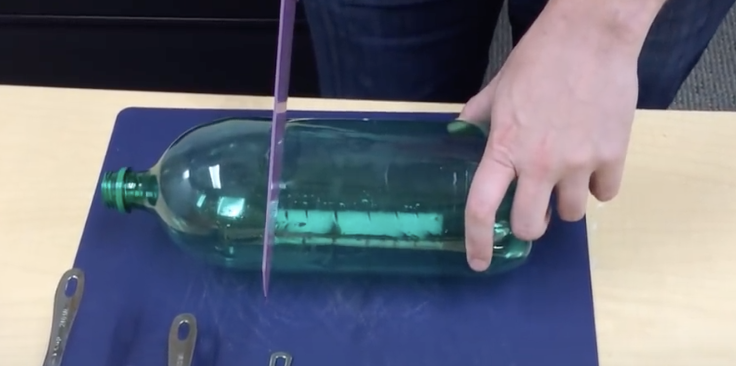
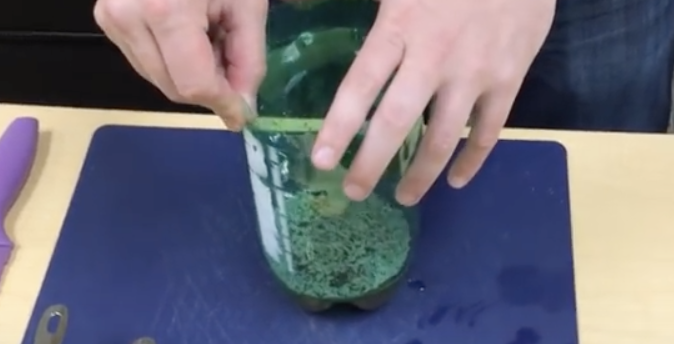
Fortunately, there is an easier and highly effective way to keep surroundings mosquito-free, and this video shows how to make a trap to catch the suckers. It takes just seconds to make, uses old soda bottles, and you can make a bunch of them for less than a couple of bucks.
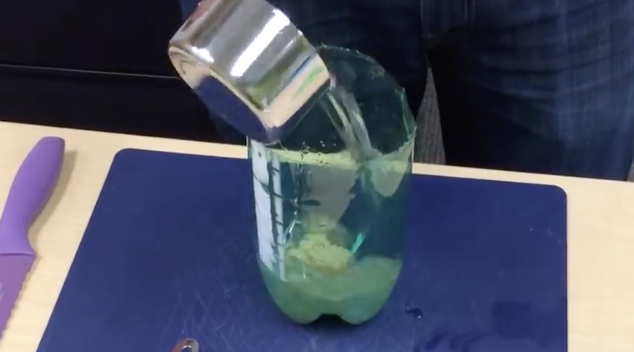
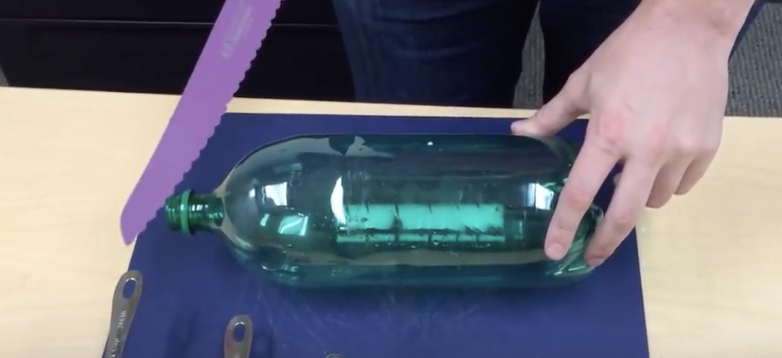
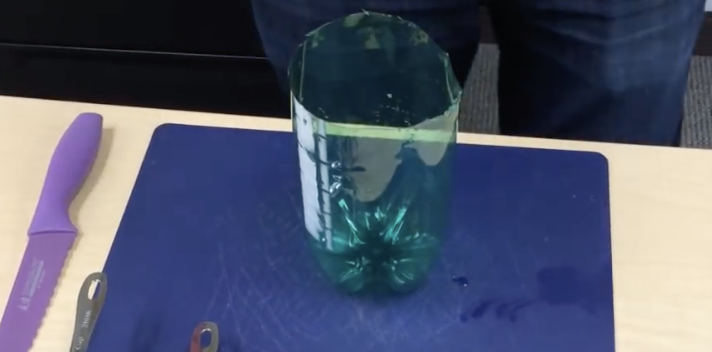
Take a 2 liter soda bottle and carefully cut a third of the top part off it. Use a serrated knife to do this, it will cut through the plastic quicker and smoother and won’t slip around as much as other knives tend to do on plastic. Place a ¼ cup of brown sugar, one cup of warm water, and ¼ teaspoon of yeast in the bottom two thirds portion of the cut soda bottle.
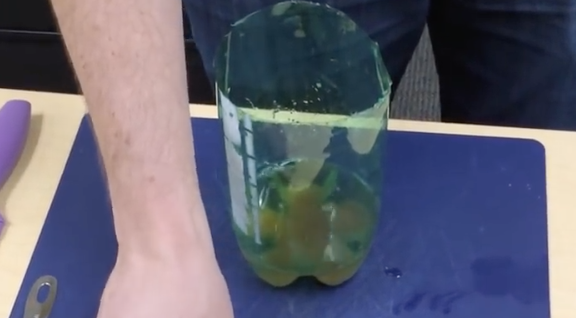
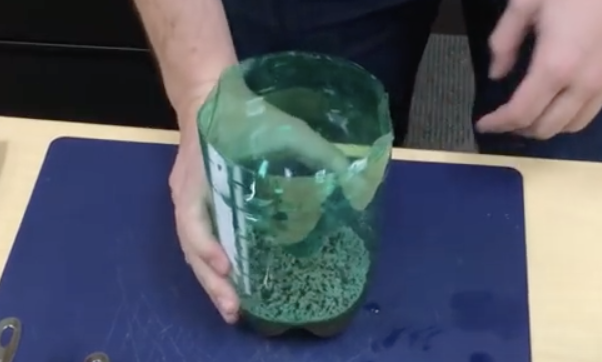
Place the top of the soda bottle upside down into the bottom half of the bottle. Make sure that the cap is off and that it fits tight and snug all around the sides. Then place the soda bottle trap outside near where you plan on sitting and let it do its magic. The mosquitoes will be attracted to the brown sugar and yeast mixture and won’t be able to resist the sweet, sticky aroma it puts off.
When they fly down inside the bottle they become trapped inside and cannot escape. The result leaves you with a comfortable, relaxing, mosquito-free atmosphere to enjoy and kick back in. Check it out, the video is definitely worth a one minute view!
Please Share This Trick With Family and Friends
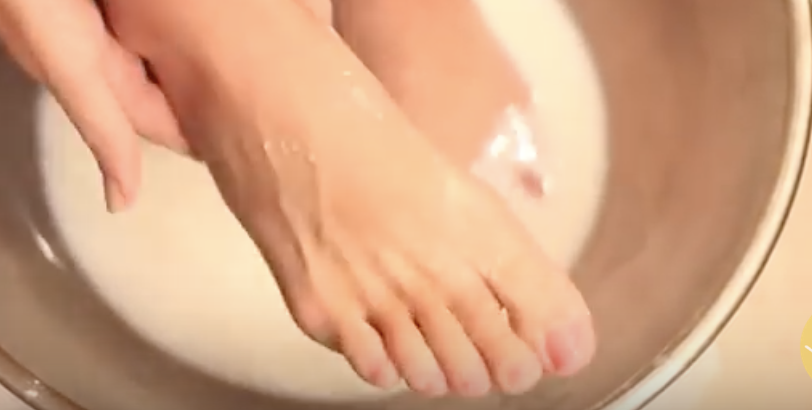
Before You Put On Sandals Get Your Feet Ready With This Simple Trick Using Two Items In Your Kitchen
Summertime means sandal season is upon us. Whether it’s open toed shoes, flip flops, or sandals, they all make us stay cool and help our feet breathe in the heat and humidity. It often feels so good and relaxing to finally free our toes from the cramped sneakers and boots that have been covering our feet for months.
However, lots of us don’t really pay attention to our feet until we have to show them in public. If your feet are not yet sandal ready, or maybe just need a little pampering to get them into tip top condition, then you have to try this nourishing foot soak that will leave your toes looking amazing.
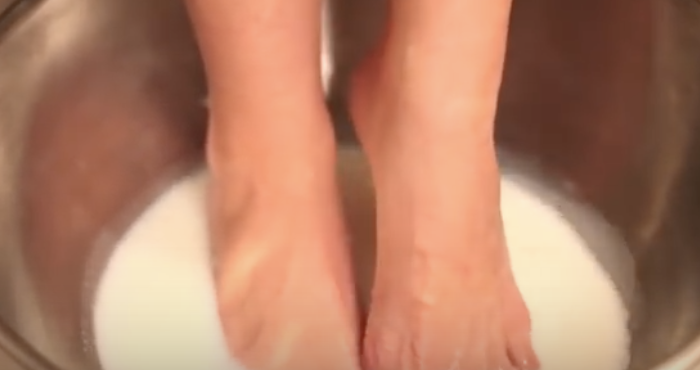
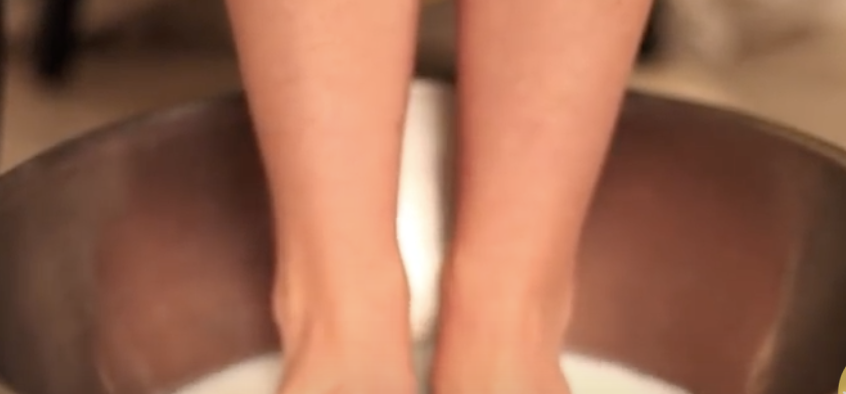
YouTuber Tabitha Blue from Kitchenwise shows us how to make a quick and easy foot soak that uses two simple and all natural ingredients that you likely already have on hand in the kitchen; milk and baking soda. If not, you can pick them up at the store for under $5 total and still have plenty left over for other things or more foot soaks down the line. It only takes about ten minutes total of your time and will leave your feet soft, glowing, and rejuvenated.
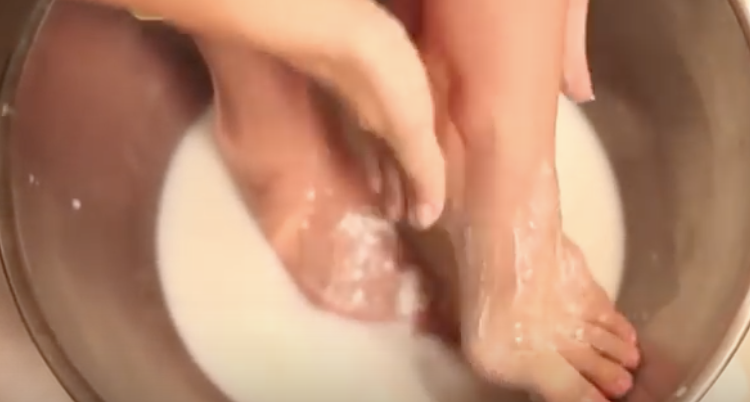
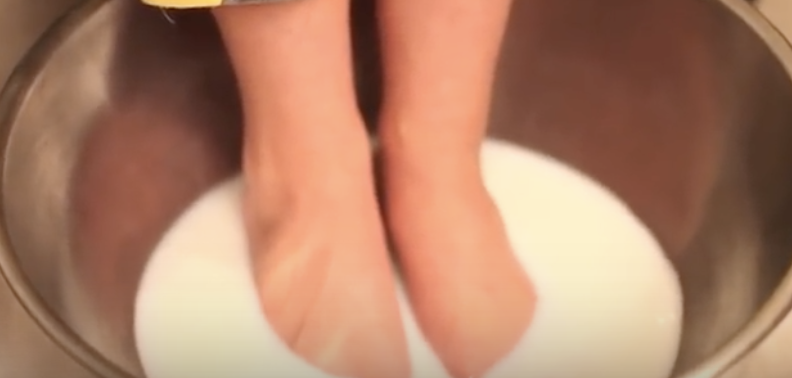
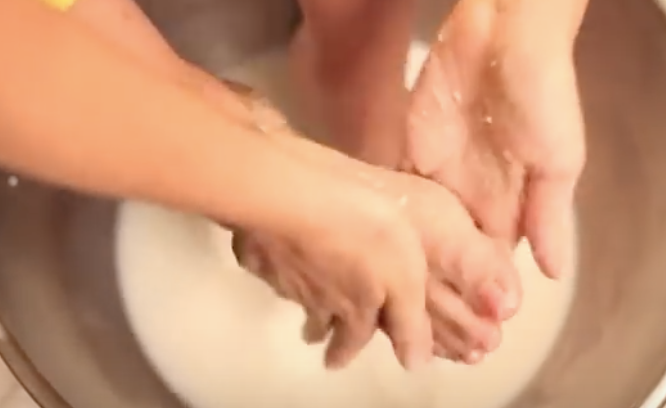
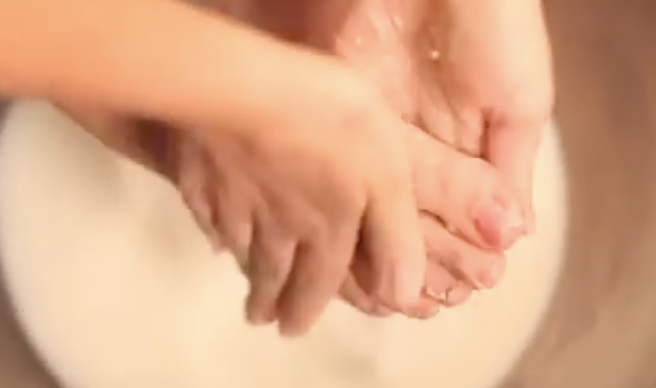
Warm up 2-4 cups of milk and pour it into a bowl or container that’s large enough to fit both your feet in comfortably. Once you have soaked your toes for about five minutes grab the baking soda and lightly sprinkle some over them in your foot bath. Work the baking soda around by gently massaging and scrubbing it onto the feet for about a minute or two.
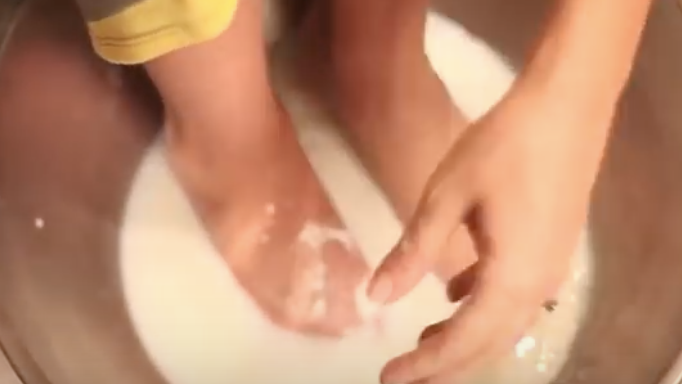
Pay attention to rougher areas or where the skin is thicker, usually heels and the bottoms of feet. Don’t forget to scrub the tops of feet too and around the upper ankle areas that are most visible when you wear sandals. After you’re done scrubbing, keep soaking your feet and sit back and relax for another five minutes.
In case you’re wondering how milk and baking soda work to beautify your feet, read on. Milk naturally contains lactic acid within it, which is often used to soften skin. This helps to prepare any rough patches for removal of the dead skin cells on them. Baking soda is naturally abrasive, so by rubbing it on milk softened feet, you can effectively remove rough patches.
That’s how milk and baking soda work so well together to soften and remove hardened areas of skin, such as tough calluses. If you haven’t tried it yet, give it a shot! Healthy, well cared for, sandal-ready feet will make you feel confident and prepared to take on whatever summer has to offer.
Please Share This Tip With Family and Friends


