
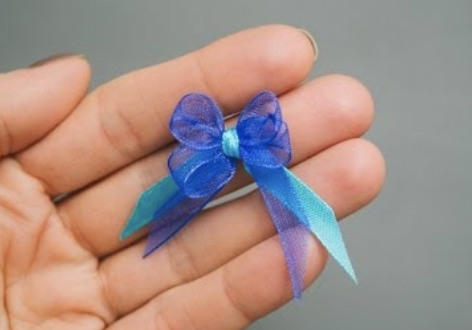
THIS Is How You Can Make The Perfect Bow Everytime With A Fork! It’s So Simple For Mother’s Day!
For some of us there is nothing more satisfying than wrapping gifts ourselves, whether it be for the holidays, birthdays or just a token of our love and friendship. Others don’t particularly like making a bow because it’s too hard, but hate spending the money on one, when it just gets ripped off and discarded.
There is a saying that, “presentation is everything”, which for me perfectly summarizes the video below. Another saying is “good things come in small packages”, and the trick you are about to watch is just perfect for those smaller gifts.
Using a fork and some ribbon, this YouTuber shows us how the small perfect bow is created in an easy-to-follow step-by-step fashion. So save some money after you learn this really fun technique for making the perfect small bow.
It is so pretty, and after trying it I can honestly tell you, that the method never fails to produce this little gem that will accent your gifts in such a thoughtful way.
Please SHARE This Bow Trick With Family and Friends 🙂
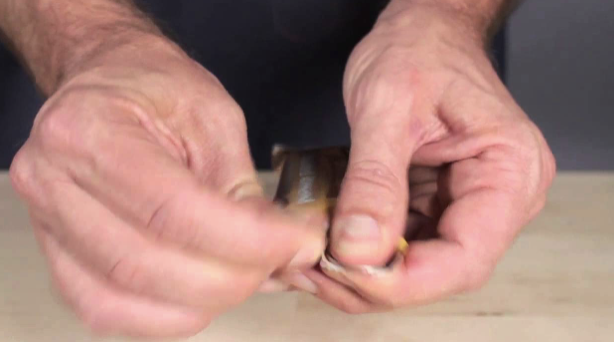
Video: THIS Simple Trick Will Make Opening Tough Packaging A Breeze and It’s Done With Only 2 Quarters!
Have you ever tried to open something that was packaged but just couldn’t get it unsealed? I’m talking about those annoying moments when no matter what technique you try the wrapper won’t rip, tear, or budge. After a little while you just end up getting really frustrated and angry, and still can’t get the thing open!
Usually it happens with food, candy, or some other type of product that you’re trying to get at, and the struggle is all too real. Eventually you have to grab a knife or scissors to open the darn things and your left feeling defeated, weak, and incompetent.
These days it seems like companies are wrapping stuff up in childproof packaging that is a real pain to break into. It may look like a simple wrapper, but looks can be deceiving. If you have ever wrestled with packaging then you need to check out this super quick video that shows a simple method on how to easily open up stuff.
All you need is 2 quarters or something similar in shape, size, and firmness to them. Other change would also work, but quarters are the biggest coins and so they’re easier to handle. Find the spot on the wrapper where you wish to open it.
Place a quarter on one side of the edge and a second quarter on the opposite side and down a little ways, so it’s not directly atop or flush with the first one. Hold them in place against the wrapper and then take the quarter on the underside and pull it towards you. The packaging should tear easily and now you can get to whatever it is you need.
This method works because it gives your fingers something to firmly grip onto. They won’t slide around or simply bend and mush the packaging which is what often causes problems when you try to open them to no avail. It also creates a nice, neat tear and keeps the wrapper in place, which is a lot better than ripping it wide open and having everything fly out all over the place.
Nothing is worse than wanting to eat a Nature’s Valley bar and having it explode in your hands, with crumbs going everywhere, and half your snack on the dirty floor! Try this out yourself the next time you have issues with a wrapper and never look back. Be sure to share the knowledge and pass this solution on to others who also suffer from wrapper-incompetence!
Please Share This Awesome Trick For Tough To Open Packages With Family and Friends 🙂
This Is How You Can Fit All Your Clothes Into A Carry-On. I’m So Glad I Learned THIS Simple Trick
Packing for a trip is a necessary evil. No one likes to do it but it must be done. The annoying task is made all the more harder by airline’s weight and size limits, not to mention the costly fees and numerous rules about what is and is not allowed on a plane. All that aside, the number one most pain in the butt aspect of packing is simply trying to fit all the clothes and shoes you need and want to bring along with you in the suitcase.
If you toss and cram stuff in randomly you are definitely not going to fit as much as you could have by neatly folding it. However, even doing that isn’t the best route to go, instead you should strategically fold things together, into a tight and compact packet, to maximize packing efficiency.
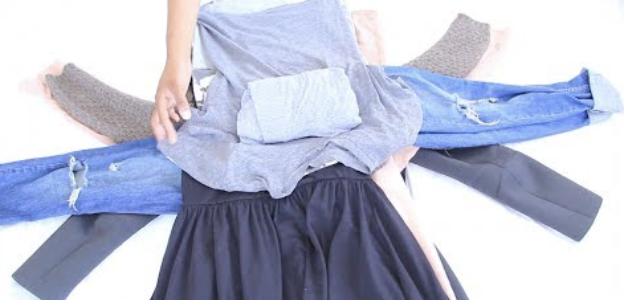
Below is my best attempt at explaining this packing technique, however a better way to understand and master it is by watching the video yourself:
Start by laying out jackets collar down on a flat surface, then place collared shirts on top 180 degrees from the jacket, collared side up. Begin to add on other shirts or sweaters directly atop one another, with sleeves lined up. Then place pants and jeans horizontally across the pile, with the legs extending outwards and the waist in the middle of it.
The key is to keep shirts on the vertical axis and pants on the horizontal one as you add articles of clothing to the pile in layers. Take all your socks and undies and wrap them up separately in a tight t-shirt bundle, then place that strategically in the middle of the clothing pile.
With the t-shirt packet in place, start to wrap up the clothing one piece at a time. Fold the clothes up into what will become one big bundle by wrapping the arms first, then body part of tops; see the video to truly understand this part. When everything has been tightly wrapped, you will end up with a nice squarish pile of clothes that minimizes wrinkles and the amount of space it ends up taking in your suitcase.
When packing up your suitcase place 2 pairs of shoes in first, one dressy and one casual. If your bag has a zippered compartment it can make a great holder for the shoes. Next, place the clothing bundle in the suitcase and then follow that with whatever else you want to bring that can fit in or around it.
Hopefully, this method will help tame the madness that packing often turns out to be. Try it out the next time you are going on a trip and see if it works for you!
Please Share This Packing Hack With Family and Friends
THIS One Easy Trick Can Get Rid Of All Those Annoying and Gross Blackheads Instantly!
Blackheads are gross and a pain in the butt to remove. Most people turn to pore cleaning strips that supposedly work to help pull them out. In reality, all that the pricey strips seem to do is dry out the fragile skin on the nose and irritate it further, plus they can be quite painful to remove.
Instead of wasting more money looking for a solution to this age old beauty problem, try out this 100% natural method. All that it requires is lemon, salt, and warm water. It’s much more effective than anything else at removing blackheads and it’s incredibly cheap and easy to do.
In a small bowl mix together 1 tablespoon of sea salt, ½ a teaspoon of lemon juice, and 1 teaspoon of water. Apply the mixture to your face, paying special attention to where any blackheads are located or where they tend to pop up. Begin to gently massage the mixture into your skin using your finger tips.
Work in a circular motion, as if you are buffing a car, and focus on areas with blackhead. Keep massaging the mixture around on your face for at least 2-4 minutes before rinsing it off with lukewarm water. Wait a few minutes and then wash your face a second time using cold water. This will help to close pores and thus keep oil, dirt, and grime from building up and clogging them.
If you’re wondering how this simple scrub works, here is a breakdown. Salt is a natural antibacterial agent and helps to unclog pores by fighting against, and ridding it of, germs. Lemon juice contains citric acid which also helps to fight germs and bacteria and thus clean skin.
The citric acid also brightens your skin, in a similar fashion to how a chemical peel works at brightening it, by burning the topmost layer off. While that sounds quite harsh, it really is not as bad as you may be thinking. The citric acid is simply dissolving away the dead skin cells, oil, dirt, and other pollutants that are clogging and blocking your pores. The result is that your skin is left glowing, refreshed, and visibly healthier.
If you want, you can also spread the lemon-salt scrub over the rest of your face. It’s gentle and safe for practically all skin types and it works incredibly well to exfoliate and polish it. However, limit your use of this scrub to only 1 or 2 times a week and avoid sunlight when applying it because lemon juice attracts harmful sun rays that can potentially burn your skin. What are you waiting for? Grab a lemon and some salt and try it out for yourself!
Please Share This With Family and Friends
THIS One Simple Trick Will Get Rid Of Those Annoying Fruit Flies and Gnats For Good!
A fruit fly infestation in your home can be more than a bother. These tiny pests, also known as gnats, can often become unbearable. It can require disposal of fruits and vegetables, replacing cleaning supplies, fixing suspect drains and plumbing and on and on.
After attempting all of these fixes you may find yourself still battling the infestation. This is due to the fact that the breeding of these gnats is rapid. If you have run out of patience with these annoying pests, there is a simple solution that I truly wish I knew about years ago!
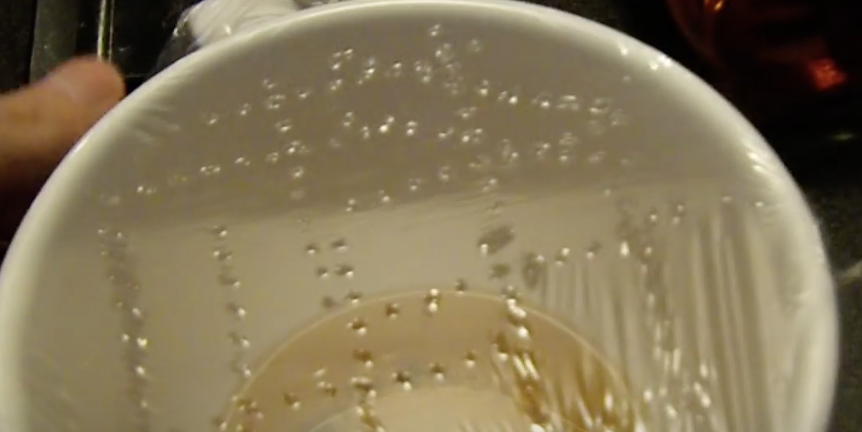
All you need is a cup, some apple cider vinegar, plastic wrap and a device to poke very tiny holes like a toothpick. This DIY will show you what to do with these simple products to finally take care of the problem. Watch this simple video, and your problem will be solved. It is the perfect life hack with spring in full swing and summer right around the corner!
Please Share this with friends and family
I Thought It Was A Terrible Idea When He Set A Wine Cork On Fire But This Unexpected Trick Is Brilliant!
One of life’s little joys can be found in a nice relaxing glass of wine. There is just something inherently comforting and enjoyable when you sit back and sip on it after a long stressful day. It seems like there is a wine out there for everyone with so many types and varieties readily available.
Once the bottle is empty it usually doesn’t take long before another one is uncorked and wine aficionados often end up with a bunch of corks laying around. Instead of treating them as waste and throwing them out put them to good use and get the most out of your wine habit!
Wine lovers everywhere can appreciate this video that covers 8 different ways to reuse leftover corks. The first project is for wine cork magnets. Cut a cork into 1/8th inch pieces and glue small magnets on one side, then decorate the other side however you wish. Similarly, you can hollow out one end of a cork, place an air plant in it, glue on some magnets, and stick it on any metal surface.
Air plants don’t require any watering because they get all their required nutrients from the air, so they make perfect low maintenance plants for this project. Next up is floating cork key-chains that will ensure your keys never sink when they end up in water. Take a cork and insert a screw eye in the middle of one end, tighten until snug, then attach a key ring and key to it.
Need a bag clip? Make a few wine cork chip clips to help keep bagged food fresh and crisp. Stand a cork up and cut down about an inch into it, move over about a ¼ of an inch and make a 2nd downwards on a 30 degree angle so you end up with a wedge. Another handy use is to make them into plant markers. Take a wooden skewer and stab the sharp end into the cork, label appropriately and stick it in the ground near the plant.
For a more decorative approach try making a candle cork vase. Take a large vase and a smaller glass of equal height that can fit inside of it. Put a candle inside the small glass, place that into the vase, and fill in the surrounding gap with an assortment of corks.
Another useful thing you can make is a cork mirror that doubles as a hot plate to protect counter tops and surfaces from hot pots and pans. Cut a bunch of corks in half lengthwise and lay them out on the mirror you wish to decorate. Glue them on 2 at a time so they frame the mirror and trim any to make it fit nicely.
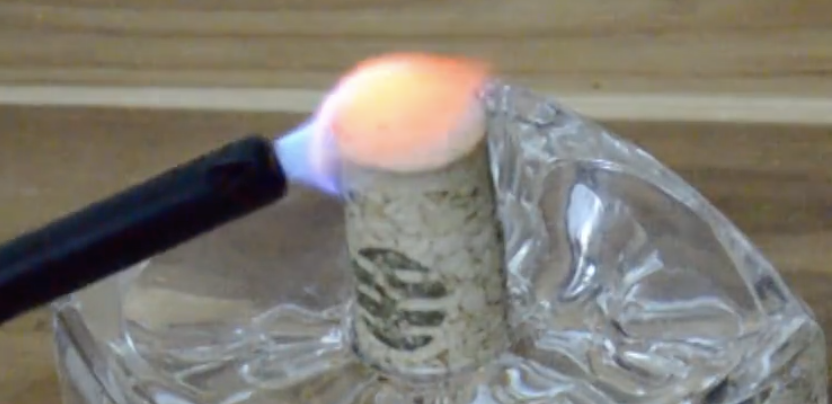
Finally, we saved the best for last, cork candles. Take a small mason jar and fill it with 70% rubbing alcohol, place a few corks inside, cover it tightly, shake it up, and let it sit for at least 24-48 hours (the longer the better). When you go to burn it simply take a cork out and place it in a candle holder that fits it snugly ad then light the top.
It doesn’t last as long as a normal candle but it’s a good alternative and great to have around in case of an emergency. That’s it! All of these DIY projects are simple, cheap, and easy to do. The next time you drink a bottle of vino, save the cork and reuse it!
Please Share These Awesome Wine Cork Hacks With Family and Friends


