
How To Lighten Dark Underarms With A Simple Trick Using Ingredients You Already Have In Your Kitchen!

Both men and women have appearance issues that make them self-conscious. Luckily there are some issues that are easily remedied with common household foods. Strangely enough the one addressed in this “TMI Tuesday”, by YouTuber Daisy, is the appearance of dark underarms.
This problem is more common amongst women, and it becomes particularly aggravating when they want to wear sleeveless garments. Being able to wear sleeveless clothes enhances women’s feelings about being sexy and attractive.
Many think that shaving will solve the problem of dark underarms, but in fact, it exacerbates the problem by irritating the skin and often making the appearance worse. Common causes of dark underarms are underlying skin conditions that can lead to an abundance of dead skin cells and hyper-pigmentation.
Further, the usual chemicals found in both antiperspirants and shaving creams, can also be a cause of the dreaded dark underarm. So, if you are too self-conscious to wear sleeveless clothes due to this problem this video is for you! Self-consciousness leads to low self-esteem.
There is no reason to let a problem such as this have a destructive influence on how you see yourself. There are dermatological medications that can be prescribed to counteract dark underarms, but this video shows us eight at-home remedies that are simple, less expensive and do the trick.
There are actually 8 different common foods, which alone or combined, do a great job of lightening your underarms. Daisy explains how they work and how to apply them in this “enlightening” video. Believe it or not, potato slices, baking soda and cucumber slices are just a few of the readily available products that remedy the problem.
There are others that you will hear about in this really useful video. Let us know what works for you. Watch the video below for more information.
Please Share This With Friends and Family
Do You Have Issues Falling Asleep? THIS Unexpected Trick Will Have You Asleep In Under 1 Minute Each Night!

Most of us spend around one third of our lives sleeping. That is based on the idea that, on average, people get about 8 hours of sleep each and every night. However, averages do not represent everyone and lots of people do not get the recommend amount of nightly shut eye.
There is nothing worse than crawling into a warm, comfortable bed and not being able to fall asleep. It can be pure torture. If you have ever stayed up all night staring at the clock, watching the minutes tick slowly by, then you know the dreadful feeling. Many of us try in vain to lull our mind and body into sleep mode, and fail.
There are many things out there to help people sleep better, from sleeping pills, melatonin, warm baths, counting sheep, and eating or restricting certain foods before bed. Some of them work and most of them fail to produce the desired effects, it all depends on what works for each individual.
One tried and true way that has helped many people fall asleep faster is the “4-7-8” breathing technique. It was popularized by Dr. Andrew Weil, a world renowned expert on holistic health and a pioneer in the field of integrative medicine. The breathing exercise can be done anytime, anywhere, anyplace and is incredibly simple.
Start by placing the tip of your tongue against the area of tissue right behind your upper front teeth, and it should stay there all throughout this entire exercise. Exhale at all times through your mouth and people have found that it can help if you try pursing your lips slightly.
Begin by exhaling completely through your mouth, expelling the air with a whoosh sound. Then close your mouth and without making a sound inhale through your nose for a count of four. After that, hold your breath for a count of seven seconds and then you can exhale completely through your mouth, again making a whoosh sound and to a count of eight.
All that should have been one complete breathe cycle and the exhalation part should have taken you twice as long as the inhalation portion. Repeat the process for three more cycles and a total of four breaths. Dr. Weil describes this breathing exercise as a “natural tranquilizer for the nervous system.”
It only gets stronger and more effective with repeated practice. You should aim to do it twice a day, whether it is to relieve tension, stress, upsetting events, or when you’re trying to fall asleep. Anyone and everyone can benefit from the measured breathing technique because it makes you mindful and focused on your breathing, rather than on the stress or thoughts that are keeping you up at night.
Check out the video for more information on the benefits of the 4-7-8 breathing technique from Dr. Weil himself. Perhaps this simple breathe trick can help you get a better, more restful nights sleep, and if that is a possibility then you definitely do not want to pass it by!
Please Share This Awesome Sleep Technique With Family and Friends
He Skins THIS Watermelon In a Strange Way. But When He’s Done My Jaw Dropped!
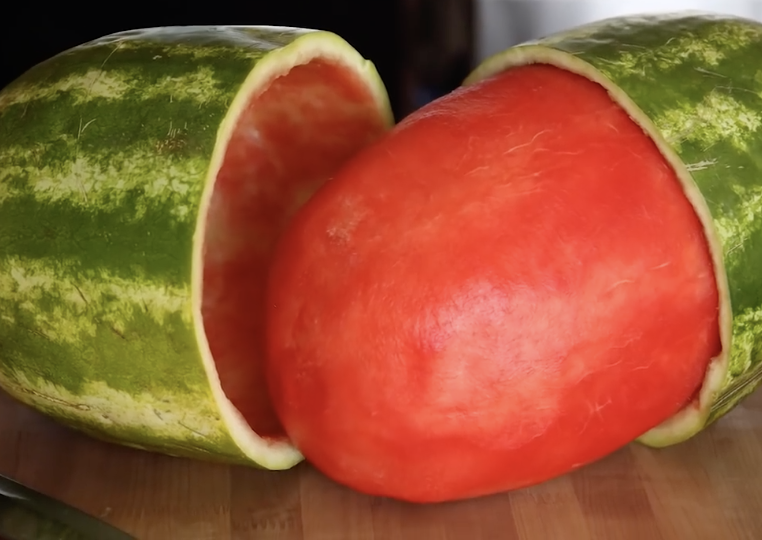
When life hands you watermelons, go to town on them and carve them up. Better yet, skin one and then stick it in another for a really cool party-melon trick! This video will show you exactly how to do just that and it’s really not that hard. It’s the perfect way to go about bringing food to a party with a little extra pizzazz.
So step up your food game, quit being so boring and bland, and give this a try. All that it requires is two watermelons that are similar in both shape and size, a sharp knife, and a brand new dish scrubbing pad. When it’s all done you’ll have the perfect snack to bring to any picnic or party.
Start with one of the watermelons and skin it by making a bunch of cuts along the sides to remove the rind and any green pieces. Basically, at this part you want to cut it in a similar fashion to the way you would cut up a pineapple.
Go over it a second time with a sharp knife to further remove any white spots and to even out the surface. In order to make it really smooth you will need to take a brand new dish scrubbing pad and sand down the fruit until it is all nice and pink.
For the second watermelon, simply cut it in half and gut it. Make sure to thoroughly remove and scrape all the pink from the insides so that the other watermelon can fit inside of it.
Now all that’s left to do is to make sure the two fit together. If they don’t, make any necessary adjustments and carve down the fruit further, then try again to see if it fits. Also, be sure to refrigerate the whole piece if you are not eating it until later.
Now you can wow friends, family, and strangers with your neat, skinned, watermelon type-egg creation. Not only is it cool to look at, it also cuts down on the mess later on. Once you slice it and eat it up there aren’t any leftover rinds to deal with. Make one today or for this next weekend!
Please Share This Watermelon Party Trick With Family and Friends
Do You Have A Broken Zipper That Just Won’t Close? This Unexpectedly Easy Trick Will Fix It Instantly!

There is nothing worse than having a zipper break on a favorite article of clothing, especially when you have gotten dressed and are ready to go out. You have no time to start figuring out what to change into and need a quick fix. Impossible? No!
Even worse than a broken zipper on clothes, (which can be changed), is a break on a suitcase as you are all packed and getting ready to leave for the airport; same nightmare with a purse or backpack. We have all had that “Oh Nooo” moment.
Zippers can be so frustrating to fix, or having them replaced is so costly…until now! The video you are about to watch is the ultimate gift, as it demonstrates a quick and simple solution for the dreaded broken zipper; a DIY that I tried on the broken zipper of my purse. It was fixed in 4 minutes!
Believe me, I am no Ms. Fixit, and I was able to do this after watching the video once, and then one more time to follow the simple steps. If you watch carefully you will be able to fix almost any broken zipper. All that was required was a needle nose pair of pliers.
It was literally like magic! I’m so happy to have found this solution to what has been an extremely annoying and costly problem. Works like a charm every time. Let your friends know about it!
Please SHARE This Trick With Family and Friends
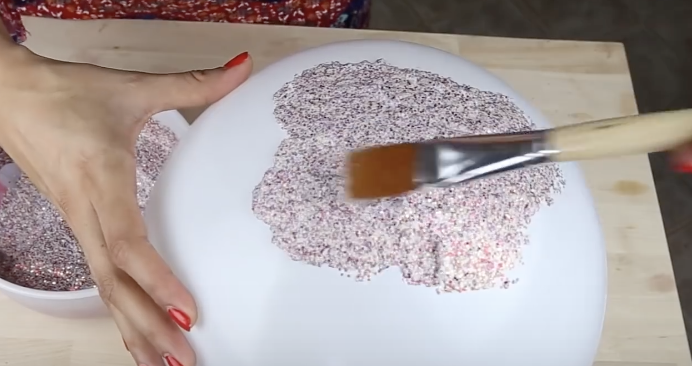
I Was Confused When She Was Painting Glitter On A Balloon. But Then She Pops It For An Unexpected Surprise!
If you are a crafty type of person who enjoys doing all sorts of do-it-yourself things then you likely have a lot of extra craft items on hand, especially glitter. Glitter is the perfect material that adds a little extra flair to practically anything.
It usually doesn’t take much, perhaps even just a pinch will do, to take something from boring to wow with the help of a little sprinkle of glitter. As such, if you have an abundance of different colored and textured glitter on hand you can easily use it up with this awesome glitter bowl project.
It’s a simple and neat craft idea that anyone can do and the perfect way to spend quality time with friends, family, and especially young children. It will get them away from TV and the internet and more involved with creating homemade things.
All this project requires is 2 cups of glitter, 1 cup of Mod Podge, a balloon, a paintbrush, and a bowl. Start by mixing up the glitter and Mod Podge together in a bowl so that they are well blended. Blow up the balloon, tie it off, and place it in the bowl with the tie facing down to give it stability and keep it in place.
Paint the glitter mixture onto the balloon surface, making sure to coat it as evenly as possible. Paint half of the balloon to make a bowl shape, or try out different designs. You can customize the bowl, such as by scalloping the edges or making it curve in uneven, distinct ways.
When you have finished painting the balloon set it aside and allow it to completely dry for at least 24 hours. When the time is up you can turn it over, pop the balloon, and remove any of the leftover rubber or latex pieces that may be sticking to the inside of the bowl .
You will be left with a soft, custom made, glittery bowl that is perfect for use as a catch-all. These glitter bowls are not the most durable or strongest bowls but they can hold a variety of little things. You can use them in the bathroom to hold hair ties and clips or whatnot.
They come in handy when placed in a location where things tend to accumulate, such as near the sink or an entrance. They make great holders for knick knacks and spare change as well. Alternatively, you can stretch one of them over an existing, harder bowl to give it a new and updated look.
There are many more ideas and uses for these neat and easy glitter bowls, and maybe you have the perfect use in mind for them. Check out the tutorial to see exactly how it is done and try it yourself!
Please Share This DIY Project With Family and Friends 🙂
An Unexpected and Easy Way To Make Tarnished and Grimy Jewelry Look Surprisingly New With Stuff Already In Your Kitchen!
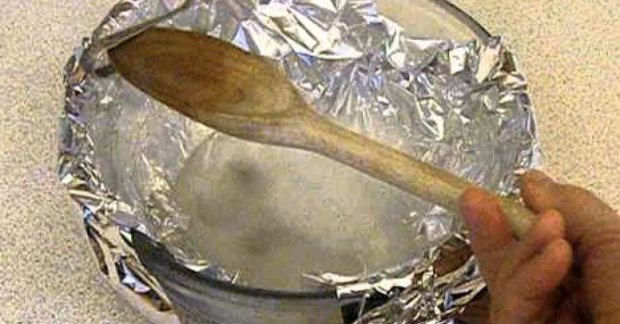
If you wear a lot of silver jewelry, that you constantly find becoming tarnished and unwearable, you will want to watch the following video. I know I don’t have the time to constantly run to the jeweler to have my stuff cleaned. Not only does the following alternative work for cleaning silver jewelry, but for any silver serving items or home accessories that you suddenly realize are tarnished.
What is great about this remedy is that it requires very little elbow grease. To clean your silver at home, all that is required are the following items: a glass bowl, aluminum foil, salt, baking soda, boiling water and dish detergent. For proportions of each item just watch this easy to follow DIY.
There is a miraculous chemical reaction that occurs within 10 minutes of soaking in the aluminum covered bowl; the bicarbonate of soda and the foil chemically attract to loosen the grime from the silver! Watch how easily your silver shines as it is removed from the liquid mixture and dried off with a cloth or paper towel.
An old toothbrush can be used to get into any small crevices. I tried this right after watching this video and Voila! It really works! It actually works safely for all metals.
Please SHARE this with family and friends


