She Sculpted This Whole Cake Into A Rose Shape. But When Slices and Reveals The Inside? WOW!
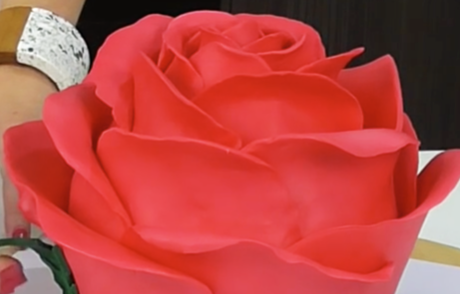
image via – youtube.com
If you want to make an extra special Valentine’s Day treat, or simply a gorgeous looking dessert, you have to try your hand at this rose cake recipe. It’s basically a work of art and even though it looks really hard to make, it can be accomplished.
All you have to do is follow along and watch what Vanessa from Cake Style does in this video tutorial and copy her every step of the way. She also included some really helpful links to the other recipes she used to make the cakes, frosting, and modeling chocolate, so be sure to check them all out.
Before you can begin decorating you’ll need to bake two 6 inch round cakes ahead of time and whip up a batch of sweet butter cream frosting. Add some red food dye to color it pink or red and then make a batch of the modeling chocolate that she uses.
Modeling chocolate is similar to fondant in that it’s easy to mold, shape, and add color to, but it’s made from mainly melted white chocolate and corn syrup which makes it taste a lot better. The main issue with fondant is that it tastes gross, so modeling chocolate is definitely the way to go.
Once you have those three main components you’ll need to gather up a few things including a large spatula, bread knife, metal or plastic scraper, small rolling pin, 3 ¾ inch round cake plate, 12 inch square cake board, cornstarch, small paintbrush, Exacto knife, water or clear alcohol, toothpick, parchment paper, cutting board, turntable, and 2¾, 2½, and 3¾ inch cookie cutters.
It may sound like a lot, but all of these things will make your cake turn out looking like a professional made it. The decorating instructions are best left to Vanessa to explain and this is something you truly have to see in order to understand and replicate it.
She does an excellent job describing everything that you’ll need to know and by the time your done you’ll have a seriously sweet looking rose cake.
Try it out, even if it turns out less than perfect, it’s the thought that counts. Plus, it’ll still be edible!
Please Share This Recipe With Your Family and Friends 🙂
He Begins Cutting Potatoes In A Strange Shape Then Puts Them In A Pan. When He’s Done YUM!
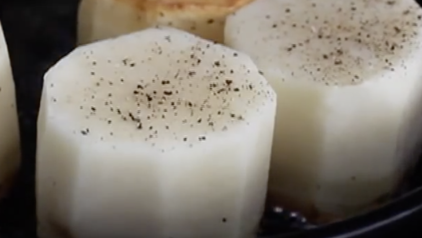
image via – youtube.com
One of the most popular and versatile food items that’s readily available and can be found at virtually any local grocery store is potatoes. Just like corn, rice, and wheat, potatoes rank among the world’s top grown crops and most widely consumed foods.
They are easy to whip up and a simple potato can be transformed and prepared lots of different ways. They can be served hot or cold and people love them mashed, baked, fried, hashed, steamed, chipped, and so on.
This recipe uses a combination of frying and baking to cook potatoes into a golden, delicious perfection. It’s super easy and unless your European, chances are you may not have heard of it yet. They’re called fondant potatoes and in the dead of winter when it’s freezing cold, they hit the spot. Here’s how you make them:
You’ll need russet potatoes, butter, vegetable oil, chicken stock, salt and pepper, and thyme (optional). Begin by cleaning and cutting the ends off the potatoes. Take one and turn it up on end before carefully slicing down the sides to remove the peel, as if you were skinning a pineapple, so you end up with an octagonal-type shape.
Cut it evenly in half and then slice up the rest before soaking them in a bowl of cold water for 5 minutes and pat them completely dry with a paper towel. Heat about two tablespoons of vegetable or grape-seed oil in a skillet over high and place the potatoes in when the oil is hot enough and appears shimmery.
Lower the heat to medium-high and cook for about 5-6 minutes, or until browned, and sprinkle salt and pepper on top. Flip them over and blot the tops with a paper towel, then place a lump of butter and a few sprigs of thyme in the pan.
Spoon some melted butter over the tops and sprinkle more salt and pepper on. When the butter starts to brown up, pour ½ a cup of chicken stock in the skillet and place that in a preheated 425 degree oven.
Roast it for 30-35 minutes or until the potatoes are thoroughly cooked all the way through and are tender on the inside. Drizzle any leftover thyme butter over the tops and allow them to cool before serving.
If you follow the recipe above, you’ll end up with beautiful looking oven roasted potatoes that are creamy on the inside and browned, crusty, and golden shelled on the outside. Let your taste buds tingle and try them tonight, bon appetit!
Please Share This Recipe With Your Family and Friends 🙂
The Next Time You Get A Bad Bruise Grab A Bag Of Marshmallows. The Reason I Had No Idea!
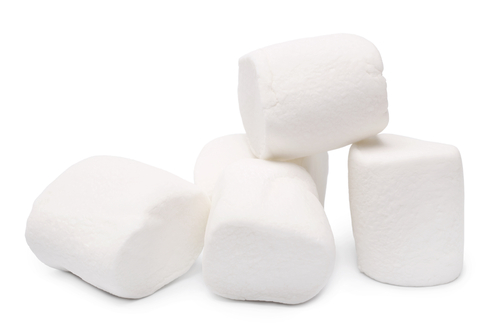
image via – shutterstock.com
The age old trick of placing an ice pack or a bag of frozen peas on a bruised body part is something most everyone has done at some point in life. In medical terms it’s what is known as a form of cold compression.
The reason why we do this is that when an ice cold object is pressed on the affected area it works to greatly reduce pain, swelling, and inflammation. Our bodies heal and recover faster and your pain and discomfort is alleviated.
Any cold object can be used, but the most common things people reach for is frozen gel packs, bags of veggies, and ice cubes is a bag. When you don’t have any gel packs or veggies on hand the go to method is almost always ice cubes.
If you’ve ever used the ice in a plastic bag method, then you know how much of a pain and messy it can be. The cubes are awkward and slide all around as they melt so it’s hard to keep them on the bruised area.
Young children usually complain about them too, because pressing slippery, freezing cold blocks of ice on bumps and bruises can be painful and it quickly gets annoying.
There is a much better alternative that you can and should use for a cold compress, and kids of all ages will love it. All you need to do is stick a bag of marshmallows in the freezer for a few minutes and when they’re cold enough press them on whatever hurts.
Marshmallows are ideal for several reasons, one being that they’re able to quickly absorb cold. All it takes is a couple of minutes in the freezer and you’re good to go.
Another reason is that they are much softer than hard blocks of ice and can be easily squished onto and molded around awkward body parts like wrists, ankles, and elbows. A bag of them can even be used as a sort of cushioned support when weight is pressed down on it.
Whereas ice cubes will usually just slip all around and not stay in one place, the marshmallows won’t. What it comes down to is that tossing a bag of soft marshmallows in the freezer is an ideal alternative to using ice cubes and packs on a bruised area.
It’s a quick, low cost, re-usable, kid friendly, and when you’re done using them you have a tasty snack on hand to eat!
Please Share This With Your Family and Friends
This Woman Wraps A T-Shirt Around Her Wet Hair. When She Removes It The Next Morning STUNNING!
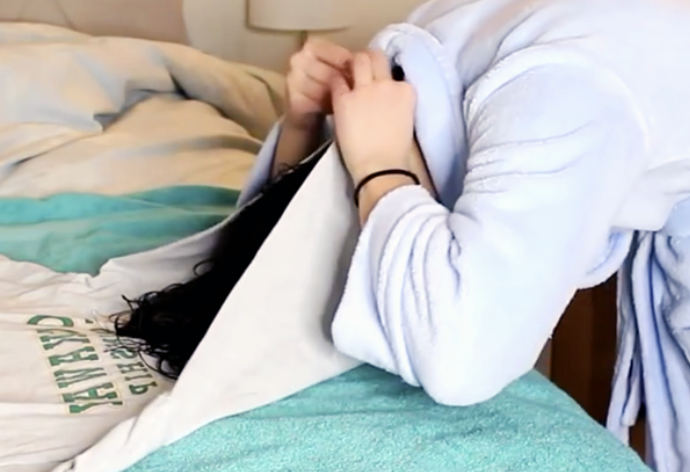
image via – facebook.com
Beautiful, bouncy curls are always in style, but attaining the effortless look of them is anything but that. Curly hair can be a real pain when it comes to maintaining, styling, and creating the perfect look. Fussing with curls too much just makes them frizzy but there’s no other way to go about doing hair other than that.
To combat the problem many people end up using way too much product, like gels and sprays, that weigh down hair and make it look bad. Others blow dry, chemically straighten, or run hot irons through curls in attempts to get hair under control.
These can damage and ruin otherwise perfectly healthy hair and eat up a lot of time, patience, and money that could be better spent elsewhere. So what’s a girl to do? There’s hope for curly haired people everywhere in the form of a simple technique called plopping or plunking.
It sounds kinda funny but this method can give you beautiful, frizz-free, bouncy curls. It’s easy to master and only requires a tee shirt. There are no expensive gadgets or serums necessary and since it’s done overnight you’ll free up a lot of time in your morning routine, yet still look great!
This video will show you how to plop your hair so check it out and try it tonight. First, shower and clean your hair, towel dry it, and add any styling product you prefer to use. Only smooth product onto hair from the ears down and don’t put any above your ears because that weighs down hair.
Also, overtime the products build up and that makes hair look really bad and unhealthy. After combing the product(s) in evenly through your hair, lay out a large cotton t-shirt and smooth it down on a flat surface in front of you, a bed works perfectly.
Shake your hair out, then flip it in front of you and carefully lower your head down onto the shirt so that the curls don’t get crumpled or tangled. Keeping your head still, grab the bottom edge of the shirt and wrap it around towards the base of your neck, holding it there in place.
Now grab the top of the tee and pull the neckline part down to the base of your neck, pulling the sleeves to the side of your head. Tie the sleeves in the front so you end up creating a turban out of the shirt and tuck in the tails or any extra loose fabric to keep it in place.
It may take a few tries to master the t-shirt turban but eventually you’ll get it right and love what plopping does for your hair. The shirt will protect your curls overnight as you sleep on them and in the morning all that’s left to do is to unwrap your hair.
Your curls will be dry, bouncy, frizz free, and while you may have to reshape a few with a curling iron, that’s it!
Let us know if this awesome hair life hack worked for you! 🙂
Please Share This With Family and Friends
She Starts Sticking ‘Shattered Glass’ Onto Her Nails. But When She’s Done My Jaw Dropped!
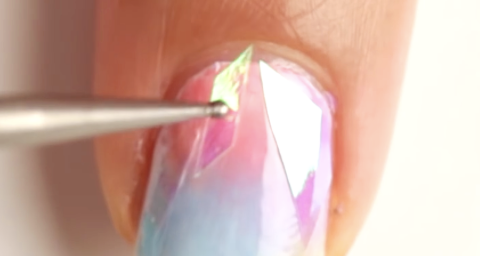
image via – youtube.com
Nail art is a lot of fun and some trends just really call to people who like to try an edgy look. If you are one of those people, the video you are about to watch below is for you. It is known as shattered glass; a new Korean nail art.
Park Eun Kyung is the nail creator; her nail lab, Unistella by E.K. has been known to come up with some of the most unique trends out there. This amazing effect of shattered glass is illustrated by YouTube channel “Creativenailart”, in an easy-to-follow way that makes it possible for you to try it at home.
She paints her nails white as a primer, then using liquid latex, she protects the edges of her nails. After drying she uses a small makeup sponge with polish colors to imprint on her nail which will help to produce the glass effect after she applies cut iridescent tissue paper and then the final coat.
It really creates a cool illusion. Let us know what you think.
Please SHARE this creative DIY with your friends and family
She Places Her Feet In A Listerine Bath For A Half Hour and Her Reason Is Genius!
image via – youtube.com
Day in and day out our hands and feet take a beating. Out of all our body parts they are perhaps the most used ones, making problems and issues that develop with them inevitable. Feet in particular are often overlooked and many of us will have to deal with calluses, cracked heels, toenail fungus, and dead skin at some point in our lives.
These things can grow worse over time and it’s best to treat them right away, before what was once a simple case turns into a nightmare of a problem. There are all sorts of gels, creams, sprays, and soaks available at pharmacies and stores that promise to treat foot issues but they are often ineffective and extremely harsh.
The chemicals and poisons they contain can have even worse effects on your body than the problem you’re trying to treat, so it’s best to avoid them at all costs. Instead, try this at home remedy that can clean your feet up and leave them smelling minty fresh.
All that you need is a shallow tub or container big enough to fit your feet, a bottle of Listerine, vinegar, and some warm water. In the tub combine a ½ cup of Listerine with ½ cup of vinegar and 2 cups of warm water. Stick your feet in the liquid and allow them to soak for at least 30-35 minutes, then after you remove them, rinse them off in the bath under warm running water.
Make sure to completely dry in between your toes and smooth on some lotion because your skin will be thirsty for moisturizer. This Listerine and vinegar foot soak will leave your skin feeling incredibly soft and silky smooth. It gently dissolves away old, dead skin cells and helps to prevent both toenail fungus and calluses.
The alcohol in the mouthwash effectively kills all of the bacteria and germs on feet and under toenails, which is the main cause of most people’s foot odor. However, it only helps with minor problems and won’t work so well with more serious or advanced foot issues that often require a doctor.
This treatment is incredibly simple, easy, and can be done in the comfort of your home anytime. Think about it like this; you have nothing to lose and potentially lots to gain by giving yourself a relaxing foot soak. At the very least you will feel more at ease and comfortable, plus your feet will smell great.
Try it today and pass this along to others to help them find comfort and better health in their own lives!
Please Share This With Your Family and Friends

