
After You Watch This You Will Never Buy Cough Medicine Again. I’m So Happy I Learned THIS.
Have you ever wondered what is in the cough drops that you buy at the store? Why do they often taste so strange and sometimes really bad? If you read the ingredient list there are usually several hard to pronounce words that sound completely foreign. Many people often wonder if some of the brands they have tried even work or help at all. Now you can skip the drugstore and make your own natural, limited ingredient, soothing cough drops to have on hand for the next time you feel sick!
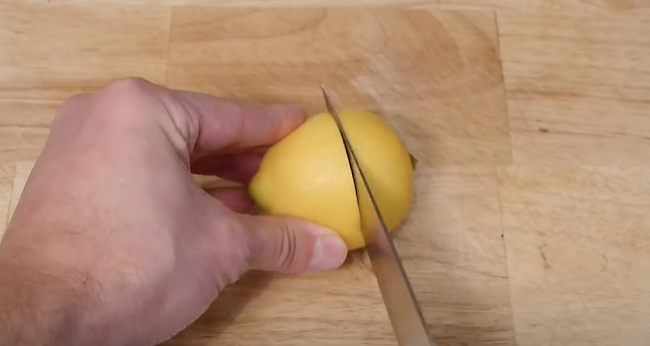
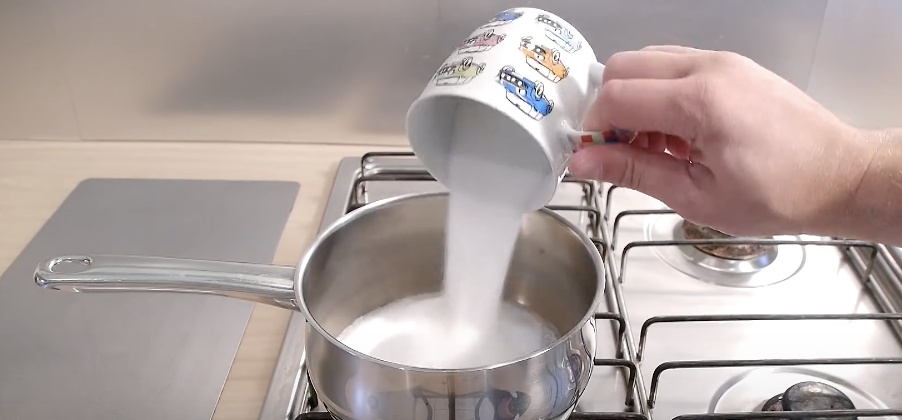
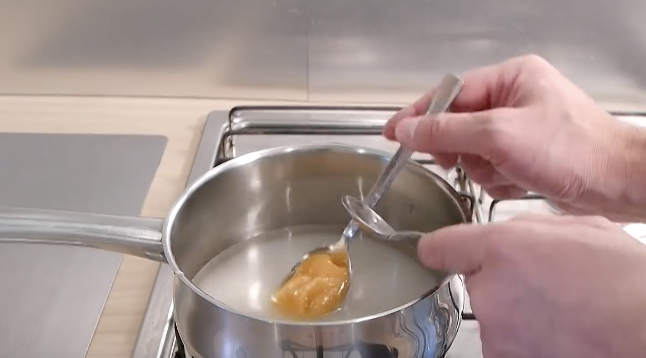
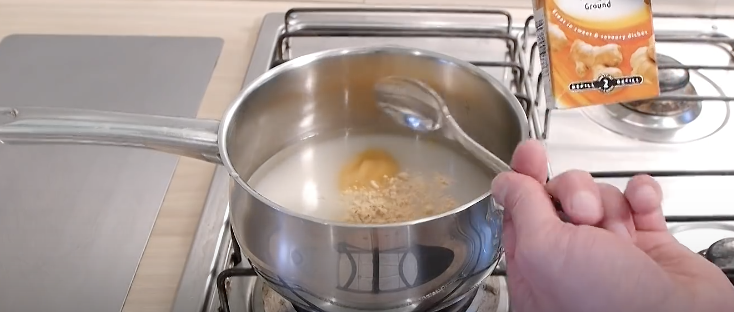
Start by filling a pan with 1 cup of sugar and a ½ cup of water. Cut a lemon in half and add 1 tablespoon of the juice to the water. The vitamin C in the lemon will help your body fight the cold. Next, add in 1 tablespoon of honey which is a natural cough suppressant, antibacterial, and helps soothe a sore throat.
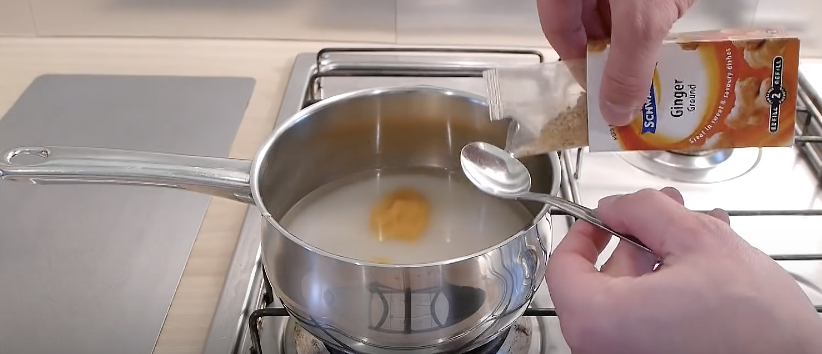
Add in ½ teaspoon of ground ginger to help with nausea, pain, and to maintain your immune system. It also has anti-inflammatory properties and tastes yummy. Continue to add in ¼ teaspoon of ground cloves that have antiseptic properties, many antioxidants and also help to reduce phlegm.
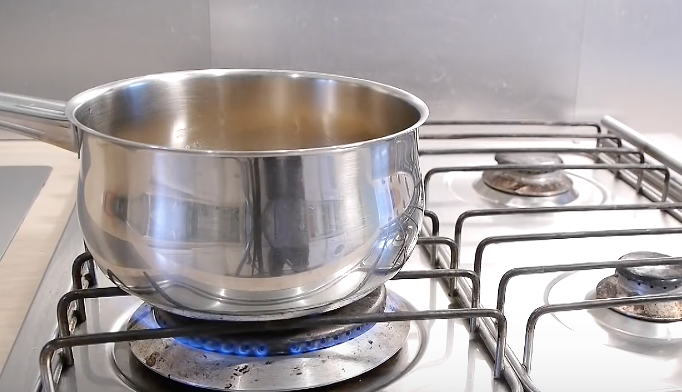
Once all the ingredients are mixed up in the pot turn on the stove and keep stirring until it simmers. Reduce the heat and allow it to simmer for an additional 15-20 minutes while stirring regularly. In the meantime, take out a baking tray and line it with baking paper, when time is up take the pan off the stove and let it cool down to a thick, dark, syrupy texture. When that consistency is met it’s now time to make the drops on your baking paper.
Spoon the syrup onto the baking sheet and make sure to be very careful because it is likely still hot. Let the drops cool for a further 20 minutes then coat with a dusting of powdered icing sugar to keep them from sticking together. Take them off the paper and check to make sure they’re all well coated, adding more powdered sugar if necessary.

That’s it! You now have homemade natural cough drops that taste great and help relieve your ills. The video mentions that you can also take a few and dissolve them in hot water for a soothing drink. Or, you can just eat them whenever like a hard candy!
Please SHARE With Family and Friends
Apparently THIS Is Why You Should Be Freezing All Your Lemons! I Had No Idea!
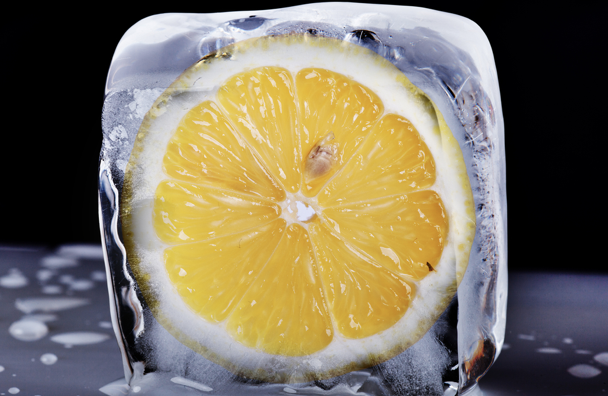
When life hands you lemons, put them in the freezer. That way you can easily grate them up later for a powerful, and tasty, health kick. The health benefits of lemons are mostly found in the skin and peel of the tangy little citrus fruits. I had no idea..
These are often lost when people eat them because only the juice and pulp get used and consumed. The skin and peel is almost always tossed or left aside because it tastes gross on its own. However, when you use every part of a lemon, skin and all, you can get between 5 and 10 times more the amount of vitamins and other health benefits out of them.
Lemons are a great source of vitamin C, as well as vitamins B6, A, and E, plus folate, calcium, copper, iron, zinc, magnesium, potassium, protein, riboflavin, niacin thiamin, and phosphorus. The yellow fruits also contain flavonoids and limonoids, which are powerful antioxidants with natural cancer fighting and prevention properties. Lemons have also been shown to help prevent diabetes, control high blood pressure, relieve indigestion and constipation, alleviate fevers, and reduce weight.
The citric acid in them helps to fight germs and bacteria and many people use them to clean and brighten their skin. When you eat a lemon you’re feeding your body so much more than just citrus juice and great flavor, but to truly gain all the health benefits from them you have to eat the entire fruit.
It follows that, in order to get all the health benefits out of a lemon, it works best to freeze it before using. First wash and clean the lemon well, then dry it off completely before sealing it in a resealable freezer bag, and place it in the freezer until it’s frozen solid. The simple reason why you should freeze it is because when a lemon is hard and solid it makes it much easier to grate.
You want to grate it, rather than slice or squeeze it, because a majority of the health benefits are found in the peel and skin. Most people use only the juice and pulp when they go to eat or cook with a lemon. Thus, by grating it you end up using the entire fruit and gain the most health benefits from it.
Once your lemon is frozen solid take it out of the freezer and cut off one of the ends to it is flat. Then begin begin grating it with the flat side against the grater, like you would a block of cheese. This makes it easier to hold steady and cuts down on the risk of it slipping while you’re shredding it up.
When you’re done, store the lemon gratings in a resealable container or use them to flavor dishes with. They won’t be overpowering when you add them to other food dishes. Instead, the lemony shreds compliment and bring out the other flavors and what you get is a very unique type of flavoring that differs from that of squeezing plain lemon juice on food.
Your mind, body, and palette will thank you, so spread this healthy tip and enjoy!
Please Share This With Family and Friends
If You Drink A Glass Of Warm Salt Water For 7 Days With An Empty Stomach THIS Happens!

If there was a simple, low cost, effective way to improve your overall general health wouldn’t you do it? There just so happens to be such a thing and all that it involves is warm water enhanced with sea salt. When you drink a glass of salt water your body starts to immediately benefit from it and in just 7 days your health is vastly improved. The solution quickly starts to remove toxins throughout the body and that in turn makes cells grow back stronger.
To harness the healing properties of salt water simply add 2 teaspoons of sea salt (**not table salt) to 1 quart of lukewarm water and stir or shake until you no longer see any salt granules in the glass or jar. Drink all of the solution on an empty stomach, first thing in the morning, for seven days straight.
After one week you should stop for the next week, and then you can repeat it every other week thereafter. It may taste a bit too salty for your palette, but your body will thank you in the end! There are many additional benefits beyond the detox aspect of the drink.
The most obvious being hydration, and when all natural sea salt is added to filtered water you’re feeding your body even more nutrients and minerals. Salt water also works to stimulate digestive enzymes in your saliva and stomach that help to break up food and thus speeds up the entire process.
Salt contains many healthy minerals which create an alkalizing effect that neutralizes acidity in the bloodstream. This benefits and improves bone health, especially in individuals with osteoporosis issues.
Another reason to drink salt water is that unrefined salt is known to reduce both adrenaline and cortisol levels. These stress hormones are a factor in relation to insomnia and besides keeping people up at night they also make you feel jittery.
By reducing their levels salt helps to calm and soothe the nervous system and that helps you get a better night’s sleep. Finally, salt water contains a variety of minerals that all greatly benefit your skin. For example, iodine increases the metabolic rate and oxygen consumption of the skin.
Chromium does wonders to alleviate dry scalp and reduces the prevalence of skin infections. Sulfur makes skin appear more radiant and glowing by keeping it smooth and clean. And lastly, zinc regulates oil glands and helps wounds heal quickly.
NOTE: If you have hypertension or any preexisting medical conditions consult your doctor before beginning the cleanse.
Please Share This With Family and Friends
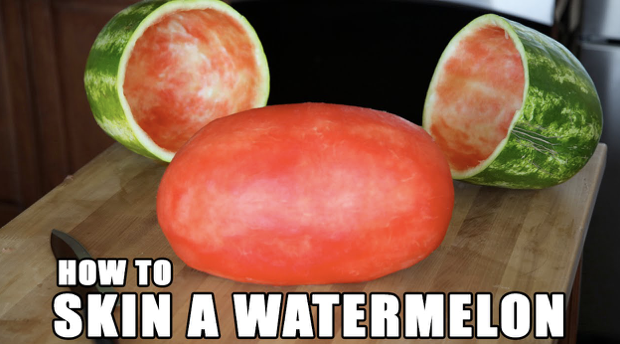
This Guy Begins Skinning THIS Watermelon In a Weird Way. The End Result Is Incredible!
Summer is coming and that means cook outs, picnics, and barbecues will be kicking off. If you want to be a thoughtful and helpful guest at any shindig, you can’t just show up empty handed. Instead you should bring something to the table, or at least offer to because it’s simply the nice thing to do.
With this party melon trick, you’ll always have something fun and cool to bring to the party. Heck, you may even blow a few people’s minds, even if they happen to belong to young little children! So if and when life hands you watermelons, go to town and carve them up. Better yet, skin one up and stick it inside of another one for a really cool and amusing twist on watermelon presentation.
This video will show you exactly how to do just that and the process is really not as hard as you’d imagine. Plus, it’s the perfect way to go about bringing food to a party with a little extra flair. So step up your food game, quit being so boring and bland, and give this a try. All you need is two watermelons that are similar in both shape and size, a sharp knife, and a brand new dish scrubbing pad. When it’s over and done you’ll have the perfect snack to bring to any picnic or party!
Start with one watermelon and skin it in a similar fashion as you would a pineapple by making a bunch of cuts along the sides to remove the rind and green pieces. Try your best to maintain the oval shape and go over it a second time with a sharp knife to further remove white spots and to even out the surface. In order to make it really super smooth you’ll need to take a brand new dish scrubbing pad and use it to sand down the fruit until it’s all nice and pink.
Take the second watermelon, cut it in half, and gut it. Make sure to thoroughly remove all of the flesh from off the inside rind. This part is crucial and you’ll likely need to scrape the remaining bits of pink from the insides so that the other watermelon can fit inside of it.
At this point all that’s left to do is to make sure that the two fit together neatly. If they don’t, make any necessary adjustments and carve down the fruit further, then try again to see if it fits. Also, be sure to refrigerate the whole piece if you aren’t going to eat it until later.
With your neat, skinned, watermelon type-egg creation in tow you won’t show up empty handed and you can wow friends, family, even strangers! Plus, it’s not only cool to look at, it also cuts down on the mess later on. Once you slice the skinned melon and eat it up there aren’t any leftover rinds to deal with.
Please Share This With Family and Friends 🙂
The End Of Your Tape Measure Has Features You’ve Probably Never Heard Of. I’m So Glad I Learned THIS
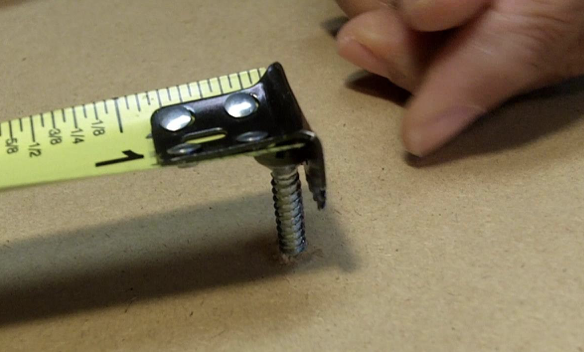
Most people think that a tape measure is for measuring things. They are right, of course, but there is more to a tape measure than first meets the eye. There are specific features built in to the indispensible tool that make it much more effective and efficient, but only if one knows what they are and how to use them. Many of the features are to be found at the terminal end of the tape itself, ingeniously built in to the metal tab that holds it in place on an edge or against a surface.
Upon close inspection, one will notice a notch in the face of the tab. If, like many people, you find yourself trying to measure something without someone to hold the end still, only to have the end slip off until your temper begins to slip with it, you can place the head of a nail or screw in the slot and it will hold the tape securely from any angle.
The second feature is the serrated edge of the tab. It can be used in lieu of a pencil to mark the measurement, and it will always be accurate because it is built in to the tape itself.
You might have noticed that the tab wiggles quite a bit. You may have assumed that you have a faulty tape measure, but they all have this feature. If you look closely at the markings of the first inch, you will see that it is 1/16 inch short.
When you hook the tape to an outside edge, the tape pulls away from the tab by 1/16 inch. Conversely, when you place the tape on an inside edge, the 1/16 inch thick tab itself makes up the missing distance. There is a final, crucial design feature that is even more helpful and rarely known, but you’ll have to watch to the end of the video to find out what it is!
Please Share This With Family and Friends
THIS Is How You Can Clear Your Stuffy Nose For Good With This Genius Trick In Only 2 Minutes

It’s that time of year again when the weather changes and we all start getting colds. There are many annoying symptoms of the common cold, but for me the very worst is not being able to breathe.
What I’m talking about here is the endless runny nose; no matter how many times you blow it to try to get relief, there just seems to be an endless supply of mucous. Your nose gets raw from all the blowing, your head hurts and you still can’t get any air!
It makes sleeping difficult, and is just generally a terrible drain on your whole system.In the video below, Prevention magazine offers two great solutions that can clear a stuffy nose in 2 minutes.
The first involves touching your tongue in back of your front teeth and tapping between your eyebrows. It’s best to watch the demonstration and explanation of how to do it, and what it releases.
The second exercise is the “Hold Your Breath and Pinch” method. Watch to see how to do this properly. I think you will find the explanation of why this works not only useful but quite interesting.
Please Share This With Family and Friends


